Garbage disposal leaking from the bottom: the four places it leaks, the newspaper test that finds which one, and the one case InSinkErator says to call about
Most bottom drips start at the flange, dishwasher inlet or discharge gasket and run down. InSinkErator's newspaper test finds which; a housing leak is a call.
- Verified
- Updated
- 8 min read
- 5 sources
Shop links on this page are affiliate links: a purchase may earn us a commission at no extra cost to you. Disclosure
Short answer
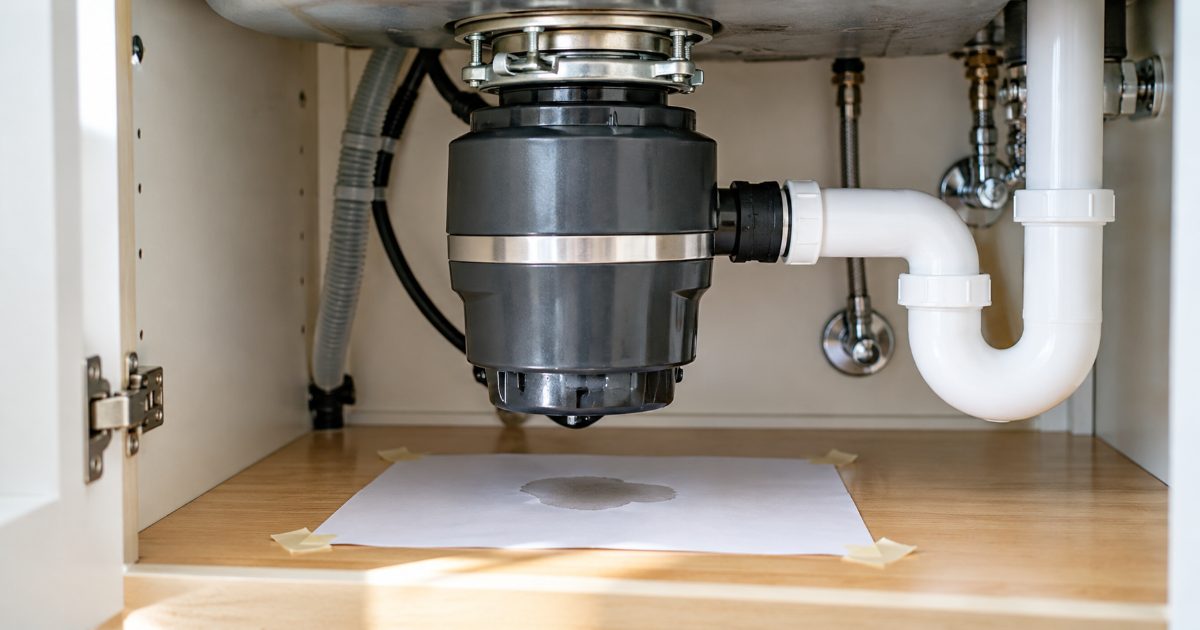
A garbage disposal that drips from the bottom is usually leaking from a joint higher up and running down the housing. InSinkErator’s leak page has you rule out three places before you blame the unit: the mounting assembly at the sink flange (three mounting screws, a locking ring, the fiber gasket and the putty under the flange), the dishwasher inlet (a hose clamp) and the discharge outlet (one gasket held by two bolts). Find the source with InSinkErator’s own method: empty the cabinet, tape newspaper flat under the unit, fill the sink, let it drain, run the disposal, and read where the wet spot lands. Those three are a tightening or a gasket, and the Badger manual allows putty at the sink flange only. If the paper is wet only under the housing, the container wall or the motor joint, InSinkErator says to contact the company, which on a Badger 5 is a 5 year warranty question before it is a purchase.
The picks
Wet spot under the sink flange on an InSinkErator
InSinkErator Mounting Gasket Kit MGK-00
InSinkErator's own mounting gasket kit; the Badger manual lists a fiber gasket and, on some models, a pleated mounting gasket in the mounting assembly. Check the fit for your model number first
Wet spot under the discharge elbow and its gasket is cracked or ripped
Mr. Scrappy drain elbow kit with gasket (third party)
Listing title: 1.5 inch elbow, flange, gasket and two screws; a third-party kit, not an InSinkErator part. The Badger manual secures the discharge flange and tube with two bolts and one gasket
Confirmed housing leak on a Badger past its warranty
InSinkErator Badger 5XP (3/4 HP, with power cord)
Badger series, 3/4 HP, continuous feed, power cord included; the Badger manual gives the Badger 5XP a 6 year in-home limited warranty
Replacing a housing-leak unit with the Evolution series
InSinkErator Evolution 1 HP
Evolution series, 1 HP, continuous feed; the Badger manual does not cover it, so its warranty term comes from the Evolution manual, not this page
Replacing a housing-leak unit with a Waste King
Waste King L-1001 (1/2 HP, with power cord)
Waste King, 1/2 HP, continuous feed, power cord included; Waste King's support site did not open for this article, so no Waste King figure is quoted here
Three of the four places a disposal leaks are a tightening or a gasket, and the fourth is a phone call before it is a purchase.
Where is the water actually coming from?
Read InSinkErator’s locations from the top: water from the sink flange runs down the outside of the unit and ends up at the bottom, which is why the bottom is the wrong place to start.
| Where the wet spot is | What InSinkErator says to check | Fix class |
|---|---|---|
| Top, at the sink flange (mounting assembly) | Mounting assembly properly assembled; locking ring rotated fully to the right; all three mounting screws tight; on a new install, excess plumber’s putty under the flange | Tighten, or remove the unit, clear the excess putty, retighten and remount; a new fiber or mounting gasket if damaged |
| Side, at the dishwasher inlet | Connection clamps tight; any hose adapter intact; elbow and trap joint tight; the knockout plug was removed before the hose went on | Clamp, adapter or hose |
| Side, at the discharge outlet | Discharge nut or bolts tight; gasket free of debris, cracks or rips; discharge elbow not cracked; elbow-to-trap joint tight; on Evolution units, tube fully inserted in the Anti-Vibration Tailpipe Mount and the mount undamaged | Tighten, or a new discharge gasket or elbow |
| Bottom of the housing | Confirm it is not leaking from somewhere else, such as the mounting assembly, and dripping down | If confirmed, contact InSinkErator |
| Through the container body wall | Confirm it is not the mounting assembly dripping down through the wall | If confirmed, contact InSinkErator |
| At the motor joint | None listed | Contact InSinkErator |
| Adjacent plumbing (trap, tailpiece) | Joints | Tighten joints as needed; find a certified plumber for help |
The mounting assembly is the ring of parts that clamps the sink flange to the sink and hangs the disposal from it; the discharge outlet and dishwasher inlet are the two side ports.
How do you find the leak?
Cut the power first. The Badger manual’s removal step is headed shock hazard and says to turn off electric power at the circuit breaker or fuse box, and its grounding section says to disconnect power before servicing the disposer. The wall switch alone is not enough.
InSinkErator’s method for a hard-to-find leak, in the leak page’s order:
- Empty the cabinet and dry the outside of the disposal.
- Spread newspaper flat over the cabinet floor and tape it down.
- Stopper and fill the sink, leave it full for a while, then look for a wet spot.
- Pull the stoppers, let it drain, and look again.
- Run the water and the disposal while you look a third time.
- If nothing shows, leave the paper for a few days.
The stage that first marks the paper is your table row. If it never marks, InSinkErator says to check water filters, the dish sprayer, the faucet, the dishwasher drain hose and the sink and countertop seams. No maker or extension page opened for this article prints a dye or food-colouring test, so this page does not describe one.
What does each fix involve?
Sink flange. The mounting-assembly page says leaks there typically come from installation: rotate the locking ring fully to the right and tighten all three mounting screws. On a new install, excess putty under the flange is a named cause, fixed by removing the disposal, clearing the excess, retightening and remounting. The Badger manual’s figure for a fresh seal is a 1/2 inch thick rope of plumber’s putty around the flange. If the fiber gasket or the pleated mounting gasket (on some models) is damaged, the InSinkErator MGK-00 mounting gasket kit is the maker’s part; check the fit on the InSinkErator model cross-reference.
Dishwasher inlet. Tighten the hose clamps and check the hose adapter is intact and the elbow-to-trap joint tight. The knockout plug inside the inlet must be out before the hose goes on.
Discharge outlet. The Badger manual seals this joint with one gasket inserted into the outlet and two bolts. The discharge page says to tighten the bolts, then check the gasket for debris, cracks or rips and the elbow for a crack. A third-party drain elbow kit with gasket replaces elbow, flange, gasket and screws together; it is not an InSinkErator part, and its listing title names the 1.5 inch size.
One rule covers all three: the Badger manual’s notice says no plumber’s putty on any connection other than the sink flange, and no thread sealants or pipe dope, because these may harm the disposer and cause property damage.
Before you buy anything
Do not buy a disposal because the cabinet floor is wet. Run the newspaper test with the power off at the breaker and read which stage marks the paper first and where. If the unit also stalls, the humming, not spinning page comes first. Only a mark under the housing itself is the next section.
When is it the housing?
InSinkErator’s leak page gives three locations no user fix: the bottom, the container body wall and the motor joint. For the first two it asks you to confirm the water is not running down from the mounting assembly; for all three it says to contact the company. It does not say the unit must be replaced, so the published fix list ends there and the next question is the warranty.
The Badger manual prints the in-home full-service limited warranty by model: defects in materials or workmanship in residential use, parts and labour included, and only an authorized InSinkErator service representative may provide warranty service.
| Badger model | In-home limited warranty |
|---|---|
| Badger 1, 1XL, 100 | 2 years |
| Badger 5, 5XL, 500 | 5 years |
| Badger 5XP, 7XL, 700 | 6 years |
Evolution units are covered by their own manual, so their term is not printed here. Past the warranty, a confirmed housing leak is a replacement. The Badger 5XP is the same series with a 6 year term, the Evolution 1 HP the Evolution series, and the Waste King L-1001 a different make, with no Waste King term quoted here. The best garbage disposal page compares them on published specs.
What should you do first?
- Switch off at the wall, then at the breaker or fuse box, and unplug a corded unit.
- Dry the disposal and tape newspaper flat under it.
- Fill, wait, drain, then run water and the disposal, checking the paper after each stage.
- Tighten what the matching row names: locking ring and three screws, hose clamps, or the two discharge bolts.
- Replace only the gasket the paper points at, with putty at the sink flange alone.
- If the mark is under the housing, body wall or motor joint, call InSinkErator with the model and purchase date first.
Frequently asked questions
Why is my garbage disposal leaking from the bottom?
Often it is not. InSinkErator's leak page says that if water appears to come from the bottom, confirm it is not leaking from somewhere else, such as the mounting assembly at the top, and dripping down. Dry the unit, tape newspaper flat under it, fill and drain the sink, and read where the first wet spot lands before deciding it is the housing.
Can a garbage disposal leaking from the bottom be repaired?
InSinkErator's page does not publish a user repair for a bottom, container-wall or motor-joint leak: once you have confirmed the water is not running down from the mounting assembly, it says to contact the company. The Badger manual gives Badger 5, 5XL and 500 units a 5 year in-home limited warranty, so check the model label and the purchase date before buying anything.
Where does plumber's putty go on a garbage disposal?
Only under the sink flange. The Badger manual says to apply a 1/2 inch thick rope of plumber's putty around the flange, and its notice reads: do not use plumber's putty on any other disposer connection, and do not use thread sealants or pipe dope, because these may harm the disposer. The discharge and dishwasher joints seal with a gasket and a clamp.
How do I find where a garbage disposal is leaking?
InSinkErator's method: empty the cabinet, spread a sheet of newspaper flat over the cabinet floor and tape it down, put stoppers in the sink and fill it, wait, then pull the stoppers and let it drain, then run the water and the disposal, looking for wet spots at each stage. If nothing shows, leave the paper for a few days and check the faucet, sprayer, dishwasher hose and sink seam.
Do I need to turn off the breaker before working on a leaking disposal?
Yes. The Badger manual's removal step is headed shock hazard and says to turn off electric power at the circuit breaker or fuse box, and its grounding section says to disconnect power before installing or servicing the disposer. The wall switch alone is not what the manual asks for. A plug-in unit is unplugged as well.
Fact sheet and how to cite this page
- Answer
- Water under a garbage disposal usually starts higher up and runs down. InSinkErator’s leak page names three joints to rule out first (the mounting assembly with its three mounting screws, the dishwasher inlet and the discharge gasket), each a tightening or a gasket. Only a leak confirmed at the housing, container wall or motor joint is a call to InSinkErator, which on a Badger 5 is a 5 year warranty question.
- Basis
- InSinkErator’s garbage disposal leaking support page and its three sub-pages (mounting assembly, discharge, dishwasher inlet), plus the Badger series installation, care and use manual for the putty rule, the gasket parts, the power-off instruction and the warranty terms by model.
- Assumptions
- A continuous-feed InSinkErator with the three-screw mounting assembly, a side discharge outlet held by two bolts and a side dishwasher inlet, which is the layout the Badger manual draws. Other makers ship their own manual; Waste King’s support site did not open for this article, so no Waste King figure appears here.
- The wall switch is off and the breaker or fuse is off before any hand goes under or into the unit, per the Badger manual’s shock hazard and grounding instructions.
- The newspaper test is run before any part is bought. Three of the four leak locations are a tightening or a gasket; a replacement unit is the answer only after the paper confirms the housing.
- Method
- InSinkErator’s four leak support pages and the Badger series manual read on 4 October 2026 and reduced to one table keyed on where the wet spot is. This is a reading of the maker’s published procedure, not a repair carried out for this article. No dye or food-colouring test appears because no maker or extension page opened for this article prints one.
- Primary source
- InSinkErator, Garbage Disposal Leaking (manufacturer or vendor document)
- Facts verified
- Last updated
- Cite as
- OwnerSpec, "Garbage disposal leaking from the bottom: the four places it leaks, the newspaper test that finds which one, and the one case InSinkErator says to call about", https://ownerspec.com/plumbing/guides/garbage-disposal-leaking-from-bottom/, facts verified 4 October 2026.
Every figure above also appears, with its source, in the article. All sources · How OwnerSpec verifies numbers
Sources
- InSinkErator, Garbage Disposal Leaking (manufacturer or vendor document)
- InSinkErator, Garbage Disposal Leaking from the Mounting Assembly (manufacturer or vendor document)
- InSinkErator, Garbage Disposal Leaking at the Discharge (manufacturer or vendor document)
- InSinkErator, Garbage Disposal Leaking at the Dishwasher Inlet (manufacturer or vendor document)
- InSinkErator, Badger Series Installation, Care and Use Manual (PDF) (manufacturer or vendor document)